
Dealing with a broken water piping in the barricade can be a daunting task, but knowing how to fix a broken water pipe in the wall can save you time, money, and prevent further damage to your home. This guide will walk you through the essential steps to repair the issue efficiently and effectively. Understanding the importance of addressing a disintegrated water tube promptly is crucial to avoid potential mold growth, structural damage, and skyrocketing water bills. By following these steps, you can confidently tackle the problem yourself, ensuring your home remains safe and sound. Whether you’re a seasoned DIY enthusiast or a homeowner looking to gain some handy skills, this article provides valuable insights and practical tips for fixing a disintegrated H2O tube in the wall.
How Can I Tell If I Have A Broken Water Tube In The Wall?
There are a few signs that can indicate you have a broken water tube in the wall. One common sign is a sudden decrease in H2O pressure or flow from your faucets. If you notice that the H2O pressure has significantly dropped, it could be due to a leak in the pipes.
Can I Fix A Broken Water Pipe In The Wall Myself?
Fixing a broken water pipe in the wall yourself can be a challenging and potentially risky task. It requires knowledge of plumbing systems, proper tools, and skills to ensure the repair is done correctly. Additionally, accessing the disintegrated pipe within the wall may involve cutting into drywall or other materials, which could lead to further damage if not done carefully.
Identifying The Problem
Before you can fix a broken water pipe in the wall, you need to identify the source of the problem. Look for signs such as water stains, damp spots, or a decrease in water pressure. These indicators will help you pinpoint the location of the leak. It’s essential to address the issue as soon as possible to prevent further damage to your home’s structure and avoid costly repairs. By accurately identifying the problem, you can take the necessary steps to fix a H2O tube in the wall efficiently.
Turning Off The Water Supply
Once you’ve identified the issue, the next critical step is turning off the water supply. This is crucial to prevent any further water damage and to ensure a safe working environment. Locate the main water valve in your home and turn it off. This will stop the flow of H2O to the disintegrated pipe, allowing you to proceed with the repair without any interruptions. Remember, turning off the H2O supply is a vital step when you fix a disintegrated H2O pipe in the wall, as it helps maintain control over the situation and minimizes additional damage.
Removing Damaged Material
After securing the water supply, the next step is removing the damaged material around the broken tube. Carefully cut away the section of the wall where the leak is located to gain access to the damaged pipe. It’s important to remove any wet or moldy drywall to prevent future issues. Properly disposing of the damaged material ensures that the repair process is smooth and effective. By addressing the damaged area thoroughly, you set the stage for a successful repair, ultimately helping you fix a disintegrated H2O tube in the wall with confidence and precision.
Assessing The Damage
Assessing the damage caused by a broken pipe inside a concrete wall can be a daunting task. The first step is to carefully examine the area for any visible signs of water leakage or damage, such as dampness, mold growth, or water stains. It is crucial to assess the extent of the damage before taking any further action to avoid worsening the situation.
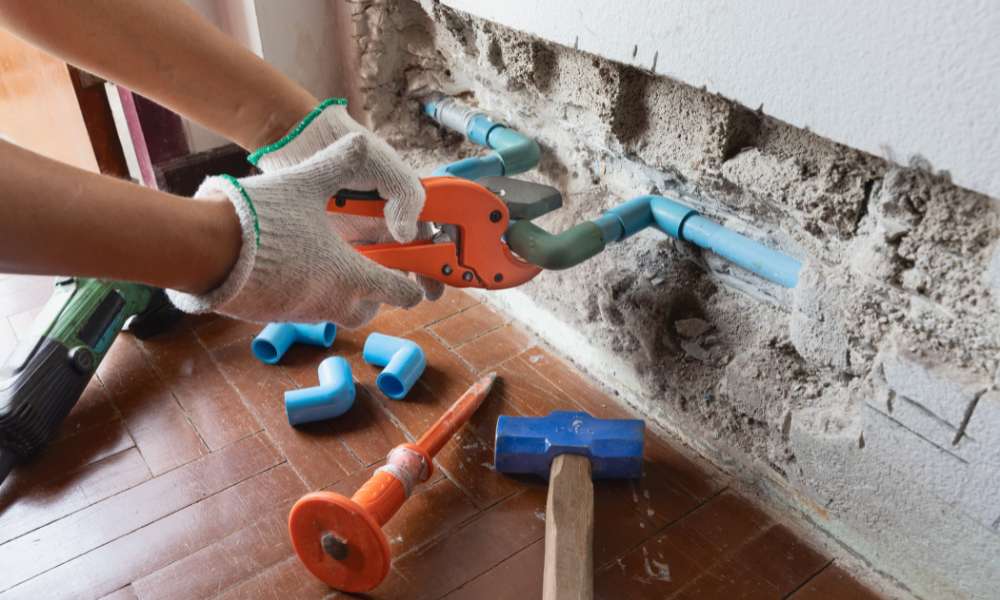
Replacing The Pipe
Begin by turning off the water supply to prevent further leakage and damage. Carefully cut into the drywall to expose the disintegrated pipe, ensuring you make a large enough opening to work comfortably. Once the pipe is visible, use a pipe cutter to remove the damaged section. Measure and cut a replacement pipe segment that matches the original. Fit the new piece into place, using pipe connectors or couplings to secure it. Ensure the joints are tight to prevent future leaks. This step is critical in restoring your plumbing system and ensuring a reliable H2O supply.
Testing For Leaks
Testing for leaks is a crucial step in ensuring the structural integrity of your home. One innovative method for detecting hidden leaks involves using infrared technology to identify temperature differences that may indicate a leak behind walls or ceilings. This advanced technique can help homeowners pinpoint the exact location of a leak without the need for invasive measures, saving time and money in the repair process.
Restoring The Wall
Once you’re confident that there are no leaks and the new pipe is securely in place, it’s time to restore the wall to its original condition. Begin by patching the hole you created to access the disintegrated pipe. Use drywall to cover the opening, and secure it with drywall screws. Apply joint compound over the seams and screw holes, then sand it smooth once it’s dry. Finish by repainting or retexturing the wall to match the surrounding area. Restoring the wall not only improves the aesthetic appeal of your home but also ensures that the repaired area blends seamlessly with the rest of the room. By following these steps, you can efficiently fix a disintegrated H2O pipe in the wall and restore your home’s appearance.
The Final Thought
Fixing a broken water piping in the wall is a challenging but manageable task that requires patience and precision. By following the steps outlined in this article, you can successfully repair the pipe and prevent further damage to your home. Remember to prioritize safety by turning off the water supply and wearing protective gear throughout the process. If you encounter any difficulties or feel unsure, don’t hesitate to seek professional help from a plumber. With proper care and attention, you can restore your H2O system back to working order and enjoy peace of mind knowing your home is safe from potential H2O damage. Take action today to address any H2O pipe issues promptly and effectively.


